Hello everybody, hope you are having an amazing day today. Today, I’m gonna show you how to make a distinctive dish, simple buns. It is one of my favorites. This time, I’m gonna make it a bit tasty. This will be really delicious.
Simple buns is one of the most popular of recent trending foods in the world. It’s easy, it’s quick, it tastes yummy. It’s appreciated by millions every day. Simple buns is something that I’ve loved my entire life. They’re nice and they look fantastic.
This twisted bun hair is simple but elegant and perfect for a casual evening or even for your wedding hair dream. Using a rope braid technique gives your hair the illusion of being thick and full. Bun hairstyles are mostly we have seen our moms and aunties having at home, but it has become a trend now.
To begin with this recipe, we must prepare a few components. You can cook simple buns using 10 ingredients and 12 steps. Here is how you can achieve that.
The ingredients needed to make Simple buns:
- Get 5 cups AP flour
- Make ready 1 (10 g) packet of yeast
- Prepare 1 cup milk
- Take 3/4 cups water
- Make ready 1/2 cup vegetable oil
- Get 1/4 of white sugar
- Make ready 1 teaspoon salt
- Make ready Modifications
- Take Substitute vegetable with butter for a richer bun
- Prepare Substitute water for milk and a bit more sugar for a dessert bun
This simple pizza buns recipe is a family favorite and a must-try! Lopez loves a center part because he Even though you're doing a low bun, you still want to feel like you're kind of lifting the face a little bit. In today's hair tutorial I am showing you how to create this Simple Bun. What I love most about this simple hairstyle is that it's quick enough to do in the morning before work, yet elegant enough to wear.
Steps to make Simple buns:
- Mix 1/2 total flour, yeast, sugar, salt in mixing bowl.
- In another bowl add the milk, water, oil, and heat to lukewarm.
- Make a well in the dry ingredients and pour the wet ingredients and mix until smooth.
- Add your flour gradually and mix until you have a soft smooth dough, it will take about another 2 to 3 cups of flour to get there. If it's too sticky for you add more flour.
- I knead the dough for about 8 minutes by hand and then keep it in a bowl to rise for about 45 minutes. Cover the bowl with a damp towel
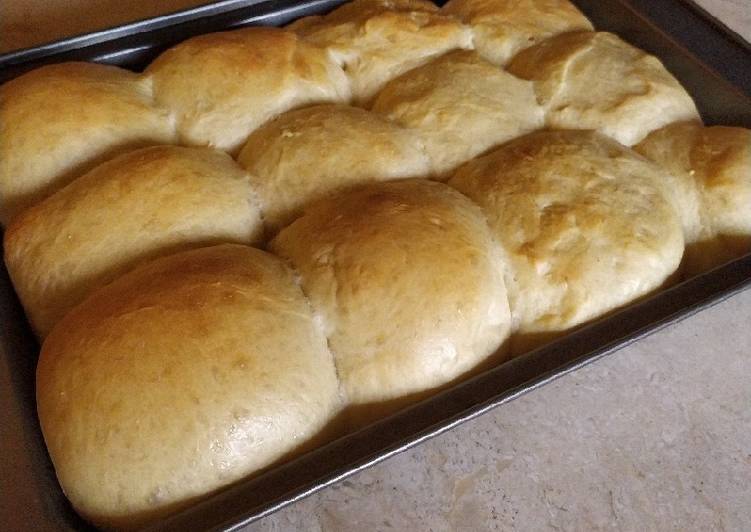
- Once the dough has risen, flour a surface and divide the dough into 12 balls.
- Grease a baking pan and preheat your oven to 200'C.
- Shape your dough into a ball by rolling it between both your palms. You'll get a rough ball shape. To tuck the ball, cradle the ball in both your palms with your palms facing up with your thumbs sitting on top of the dough. Push into the bottom of the ball with your fingers and spread the top using your thumbs. You'll see the top of the bun stretch and become smooth.
- Arrange your buns into the baking tin and let sit for about 10 minutes. They should puff up once more. Once they have proofed again, you should brush the tops of the buns with either egg wash, butter or milk, depending on what your bun is for, it'll give it a nice colour and flavour.
- Put the tray into the oven for 15 minutes at a time at 200'C. After the first 15 minutes I rotate the tray a 180 degrees and cook for another 15 minutes.
- Depending on your oven, they should be done or close to done by now, if the tops are to your liking then you can remove them now. If not, bake for another 10 minutes maximum. Keep checking your buns at this point. When bread is first baked and hot the top will be hard naturally, once it cools down a bit it'll become softer as a bun should be.
- Enjoy your buns!
To make these chocolate buns, I took my simplest bun recipe and added cocoa and chocolate chips to it. In my experiments, I started with much more cocoa powder and chocolate for a deep chocolate. Simple but delicious muffins without the filling. the Recipe is simple to prepare, but very delicious buns without the filling, you can prepare for Breakfast or just as a separate dish. The simple bun is a hairstyle any long-haired lady or fella can pull off in the blink of an eye: Just This chignon-style updo is kind of like a reversed simple bun: Instead of pulling the loose ends through. Buns come in all shapes and sizes, but most are created with the same basic This is the actual bun-making step.
So that is going to wrap this up for this exceptional food simple buns recipe. Thank you very much for reading. I’m confident that you can make this at home. There’s gonna be more interesting food at home recipes coming up. Remember to bookmark this page on your browser, and share it to your family, colleague and friends. Thank you for reading. Go on get cooking!


